Credits: Ice Dragon for the transparency techniques and Mage Knight 404 for his Ike sprite
Recommended programs: Microsoft Paint (for Steps 1, 2, 3, 5 and 6) and Adobe Photoshop or GIMP (for Step 4).
(Other decent image editing programs may work just fine.)
Step 1
| Blank | Example |
|---|---|
 |
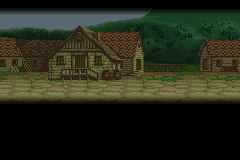 |
When making battle scenes, your document size should be 240×160. It would be recommended that you save your images in BMP or PNG format whilst making the battle scene.
Layer 1Find a suitable background and paste it onto a blank document. Save this image and keep it safe for later. |
|
Step 2
| Blank | Example |
|---|---|
 |
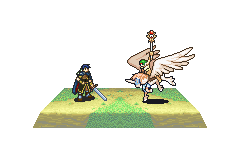 |
Layer 2In a new image document, copy and paste suitable platforms onto the template shown above. Then position your two characters somewhere suitable. |
|
Step 3
| Blank | Example |
|---|---|
| – | 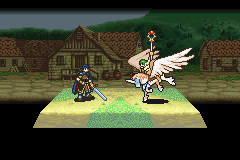 |
| Paste Layer 2 over Layer 1. Make sure you set the transparency setting correct (white is usually the transparent colour in most cases). | |
Step 4
| Blank | Example |
|---|---|
| – | 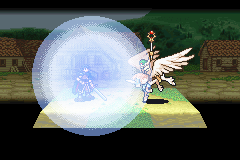 |
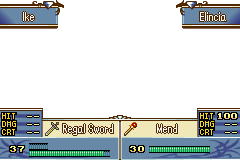
| Now it is time to add any special effects (if there are any). These might include magic spells, or perhaps recovery spells like the above example. If you want some authentic looking effects, please check Lesson 2 of the Advanced Tutorial.
Once you’ve finished save this image for later. |
|
Step 5
| Blank | Example |
|---|---|
 |
 |
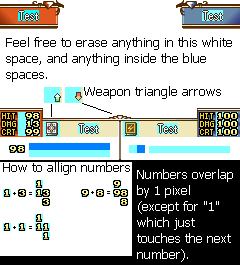
Layer 3Now you’ve nearly completed the scene… This is the slightly boring part where you enter all the numbers and stuff ^_^;;;. You can find some materials needed for this part here. Some of the “rules” for the numbers and alignment are shown here. |
|
Step 6
| Blank | Example |
|---|---|
| – |  |
| Paste Layer 3 over the finished image from Step 4. Now your battle scene is complete!
Not bad if I might say so myself… |
|