With less than a month to go until the game’s release in Japan, Nintendo dropped a bombshell of sorts with the reveal of the “My Castle” feature.
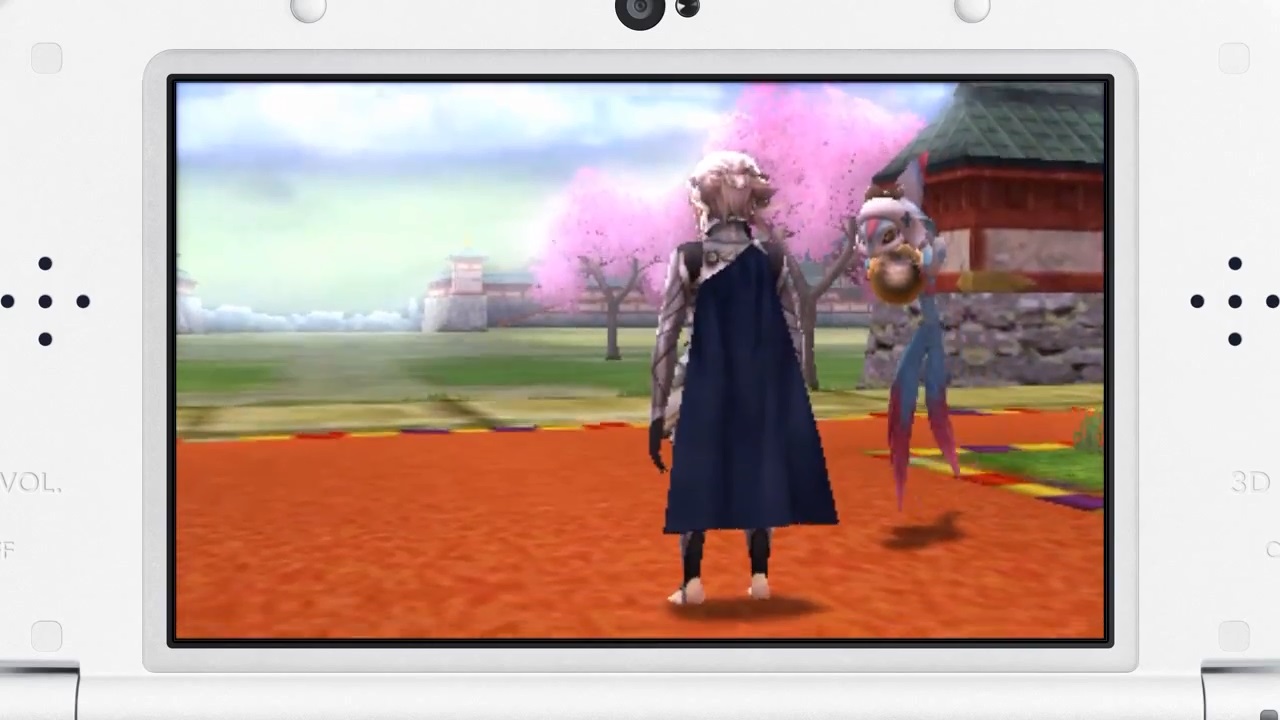
The Avatar and Lilith at the back of My Castle.
As the name suggests, My Castle is the player’s base of operations; it is a castle town populated by the game’s playable characters and it can be developed to the player’s liking.
It functions in a similar manner to the world map of Awakening and can be accessed between story chapters. Also, to clarify, My Castle is present in both the Hoshido and Nohr campaigns!
First introduced in the 31st May Japan-only Nintendo Direct, soon afterwards Nintendo published a dedicated trailer that explains the functions of My Castle–this analysis will be mainly based on the more-detailed dedicated trailer.
Note: Because the trailer is over 9 minutes long and contains a lot of new information, I’ve split this analysis into two pages.
The trailer begins with the hosts, Felicia and Joker–the Avatar’s personal maid and butler (hey, he/she is royalty after all!)–welcoming the viewers and explaining what My Castle is all about.
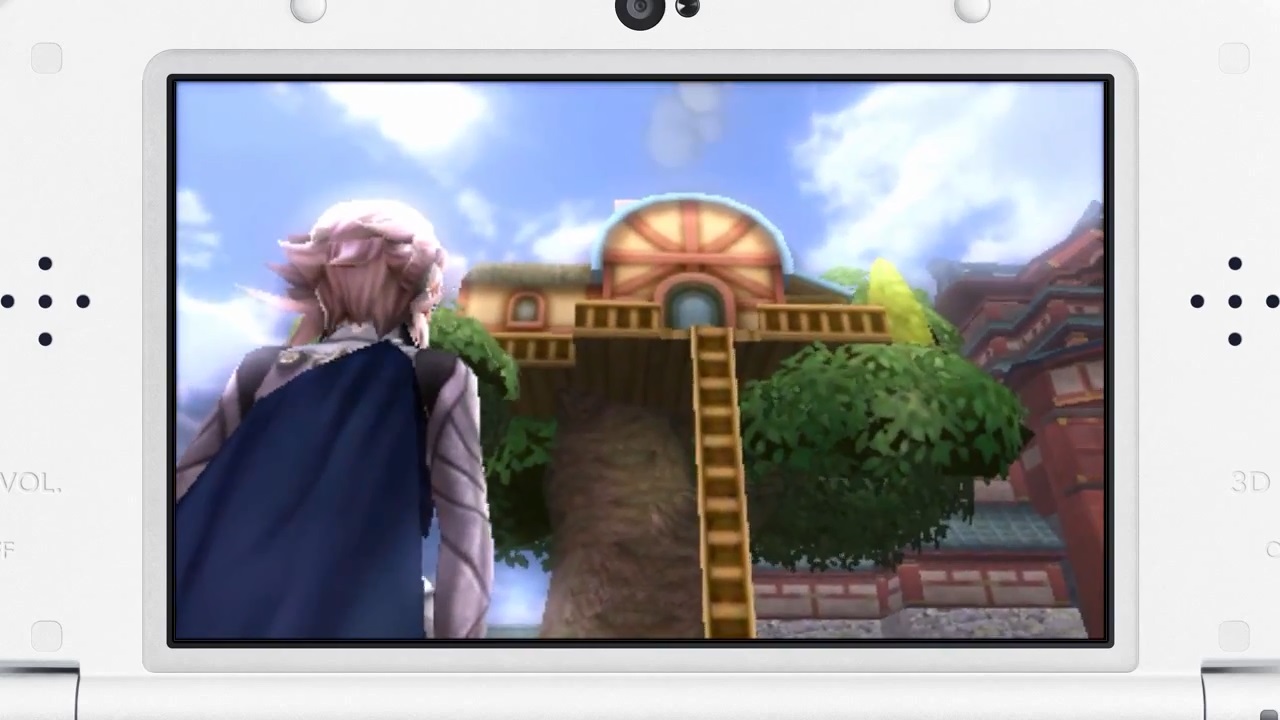
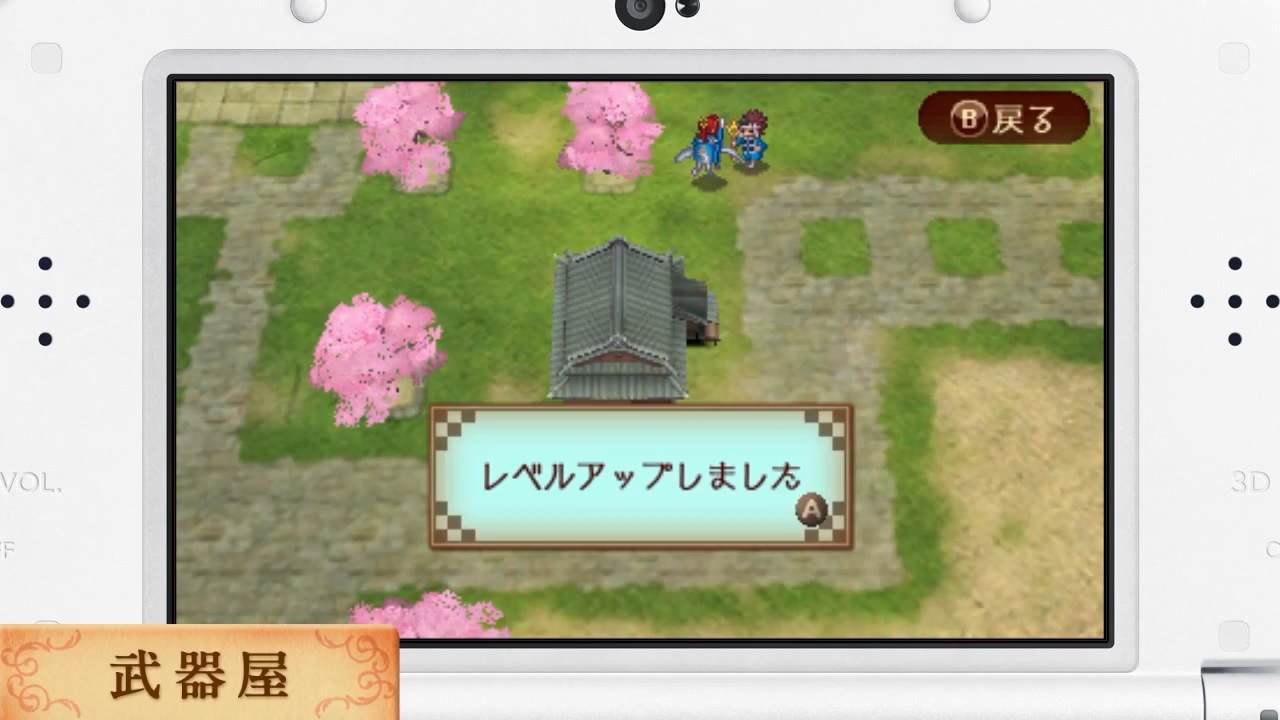
To begin with, the most radical change is that, within My Castle, the player can freely roam around the map, akin to a traditional RPG. Seasoned fans may know that a similar feature was included in Fire Emblem: Gaiden.
While walking around the castle town, players can interact with the playable characters or peruse the town’s facilities, such as your usual armouries and vendors or oddities like a statue of the player.
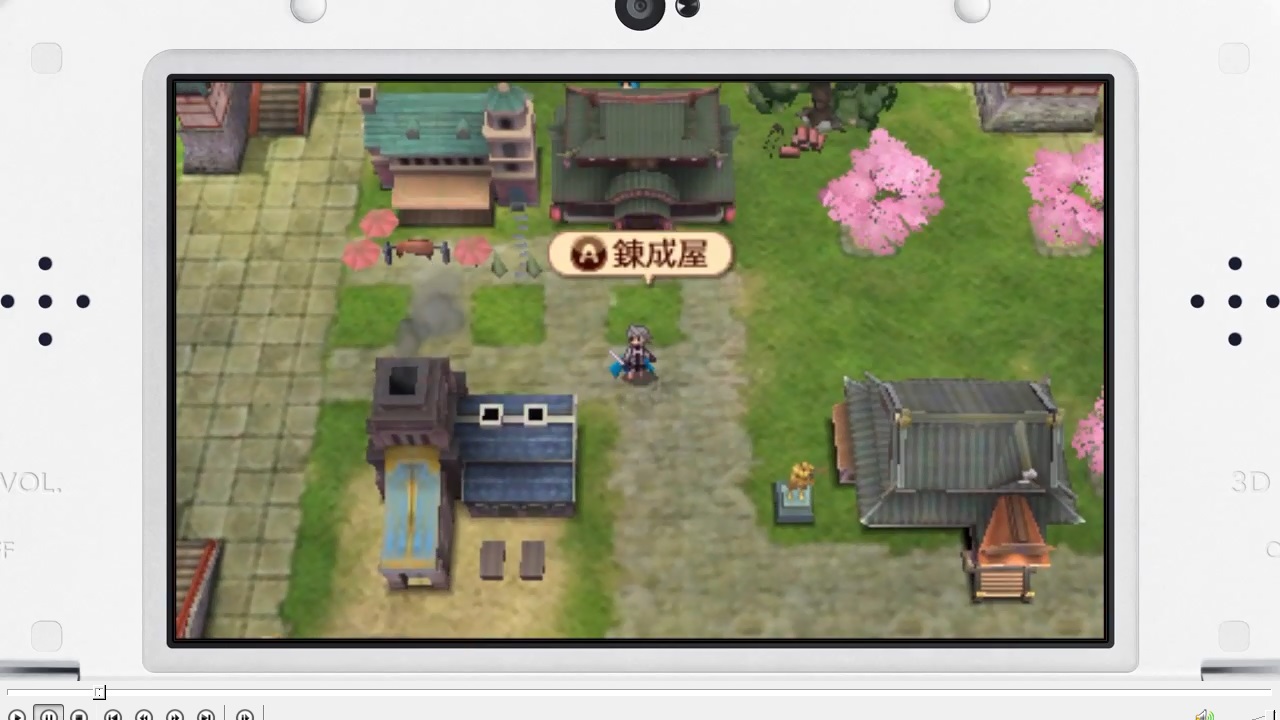

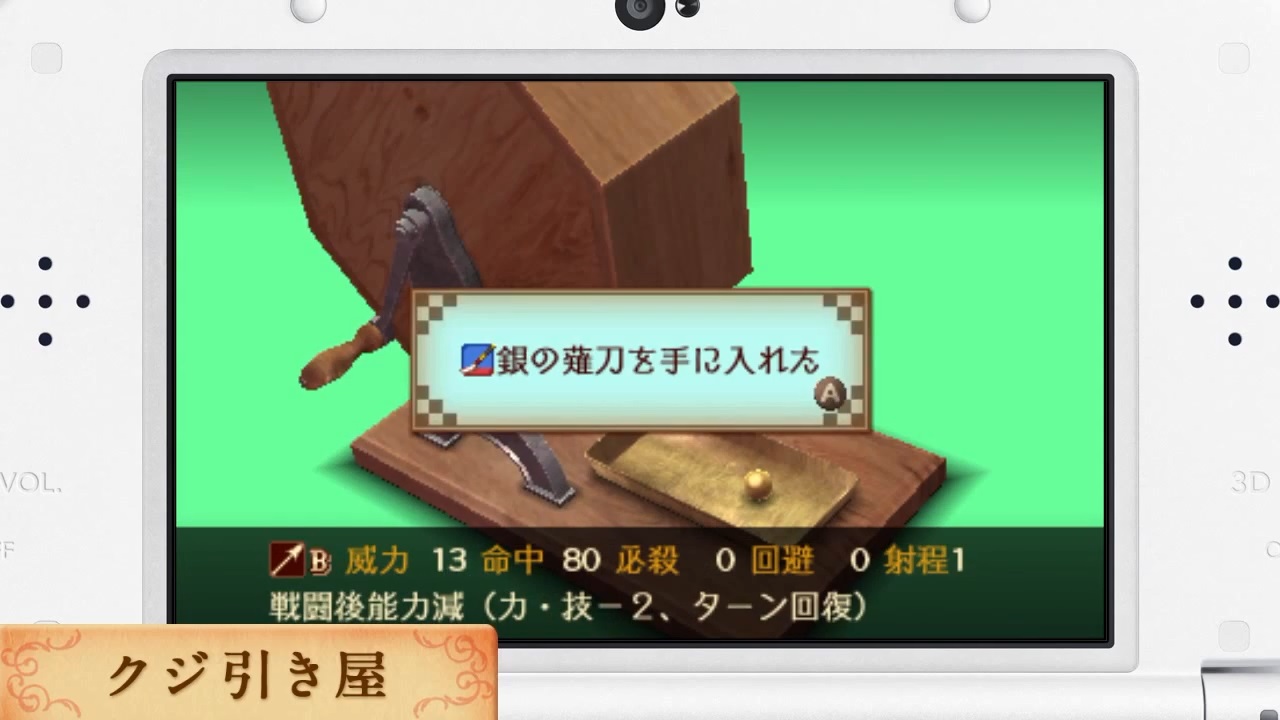
Of note, one of the facilities is a Forge, so forging of weapons (which has been available since Path of Radiance) appears to be back. One difference is that ore (resources) are required to forge weapons.
Although movement uses the game’s standard top-down (bird’s eye) view, there is a command to switch the camera to a third-person perspective–the sole purpose of this seems to be to admire your castle’s surroundings and movement is probably not possible.
After showing us what My Castle looks like, our eager hosts formally begin with the explanations.
Part 1: Construction of the castle town
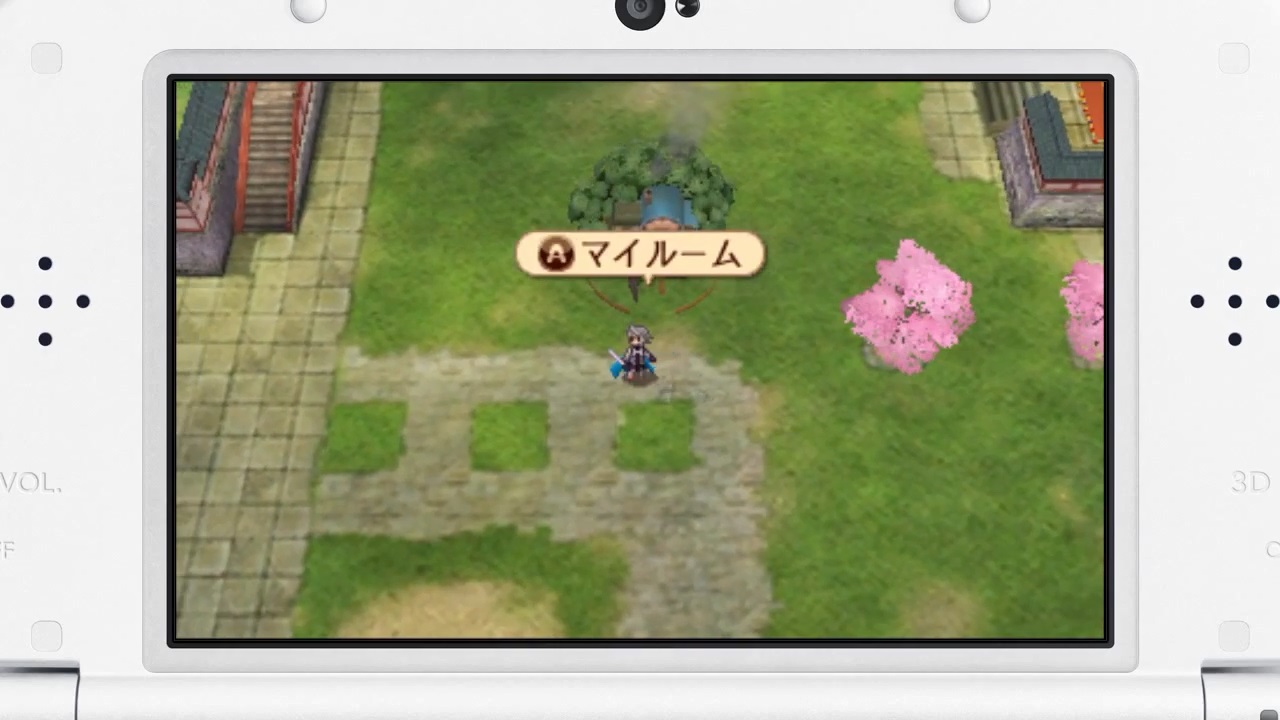
At the beginning, the castle town is mostly empty with only one notable building–My Room. This building, which is built high up a tree, functions like the Barracks in Awakening, but this time it’s the player’s personal space.
Dotted around, there are various spots where players can gather resources. The examples shown include a Vegetable Plot (Green Vegetables), Amethyst Spring (Amethysts), Field (Rice), Crystal Crag (Crystals) and Dairy Farm (Milk).
These resources are typically exclusive to My Castle and they have many uses, so it’s probably a good idea to gather them when you can–most likely when an exclamation mark appears above a gathering spot. Some resources may be exclusive to Hoshido or Nohr too.
Armoury
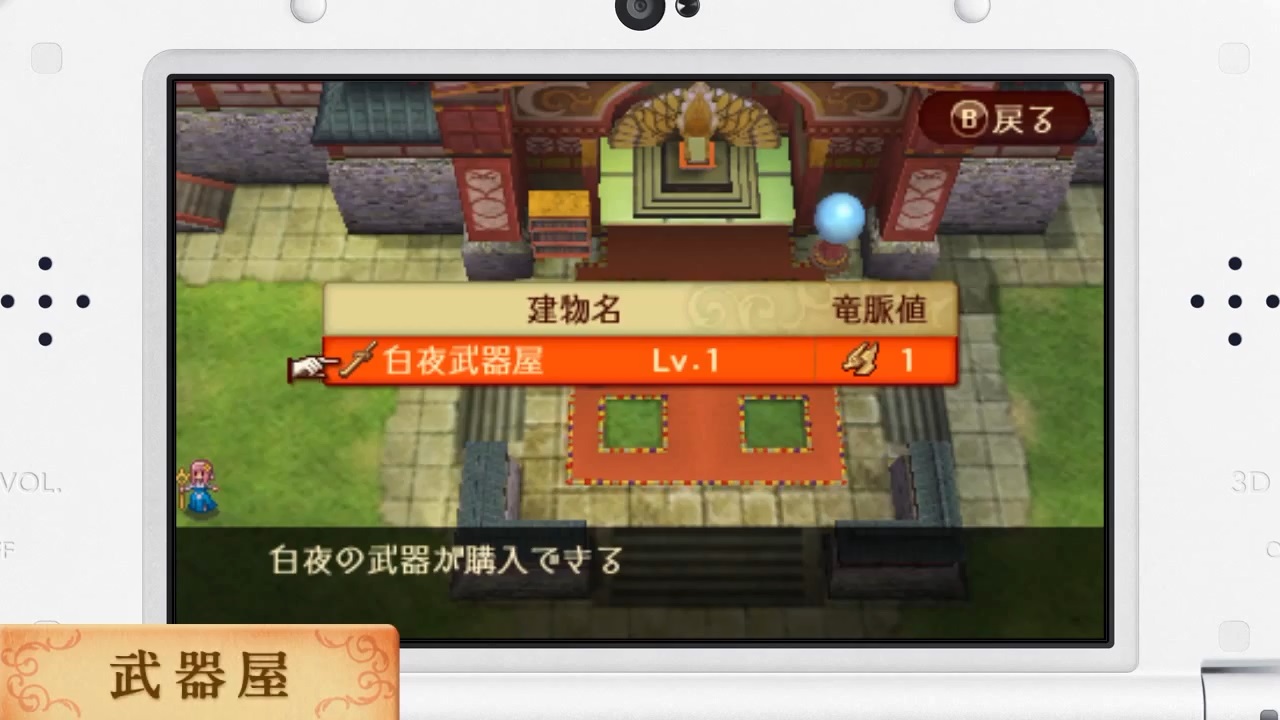
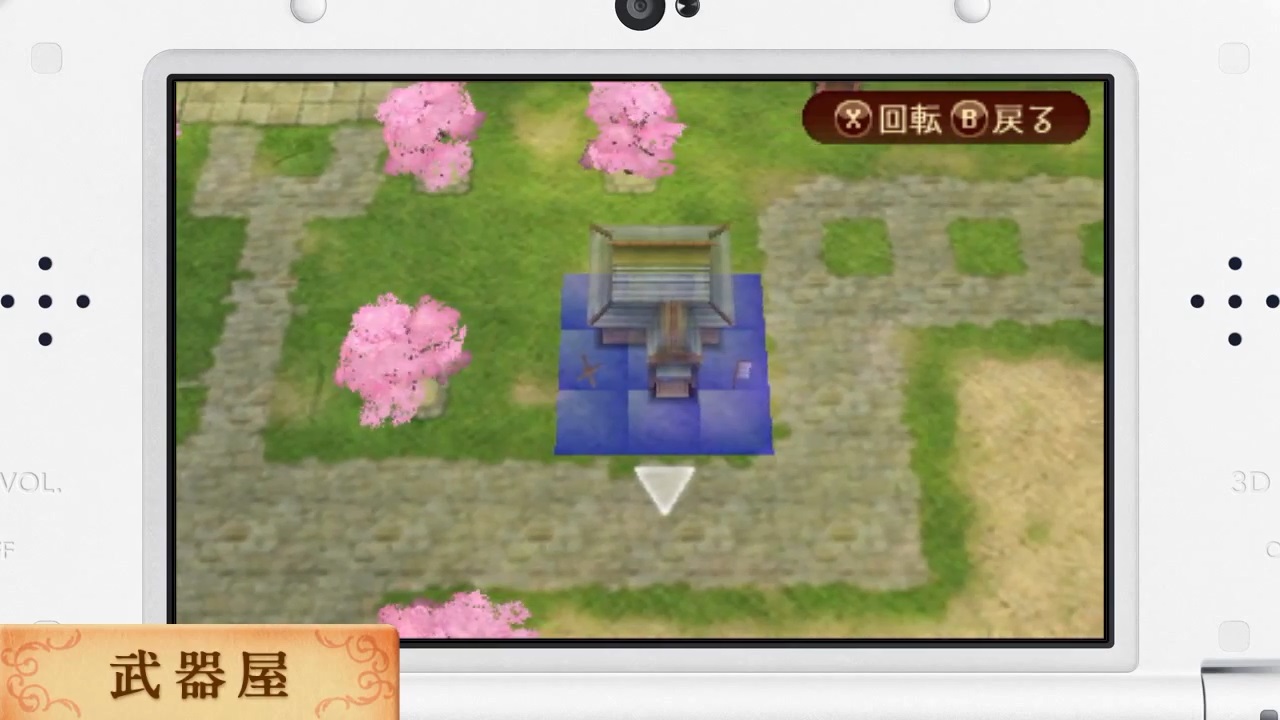
Eventually, the time comes to add more buildings to the town. Players can select the types of buildings and manually place them on the map, even rotating them 90 degrees. Buildings can be placed where there’s open space or even on roads.
Once the position of the building has been confirmed, players must expend “Dragon Vein Points” to create the building. 1 point is required to construct a Level 1 Hoshidan Armoury for instance.
To make things more interesting, the buildings are managed by playable characters; in the example shown, Rinka is managing the Hoshidan Armoury (and Kazahana in the Nintendo Direct).
Earlier, we learned that Hoshido and Nohr have their own set of weaponry and this concept is reinforced by the shops only selling Hoshidan items or Nohrian items, depending on type of shop built–which itself depends on the campaign being played.
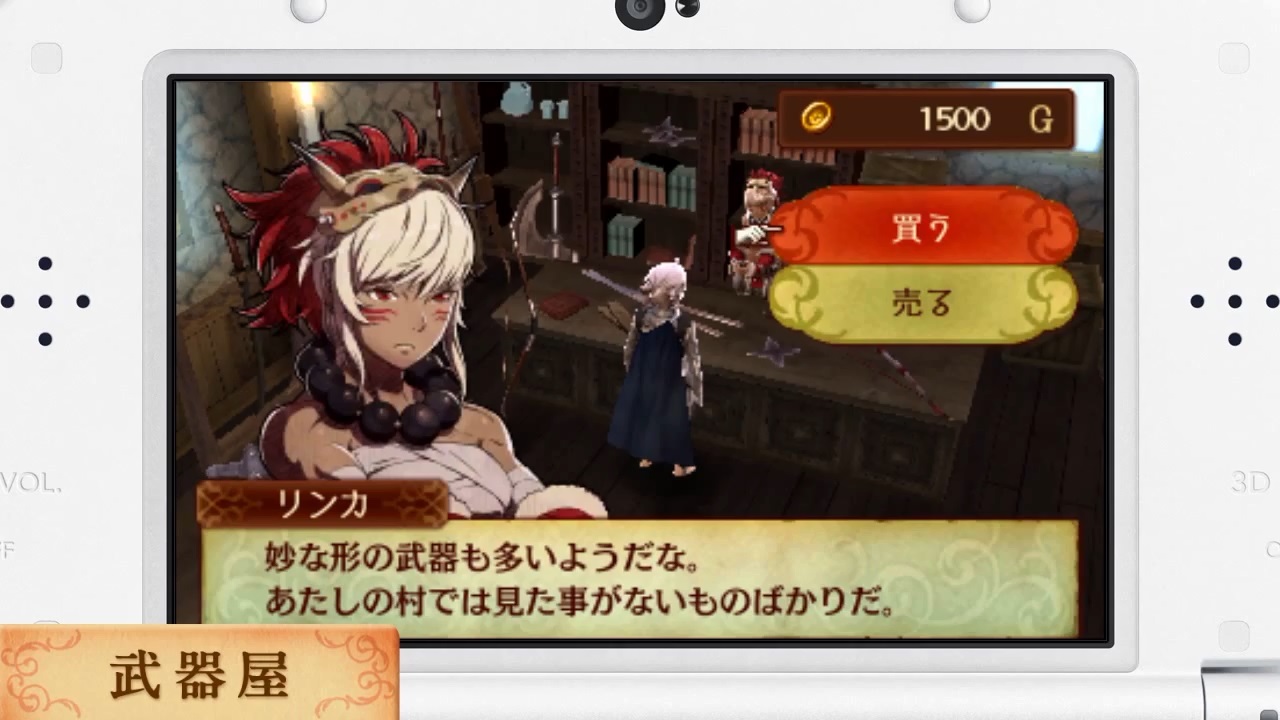
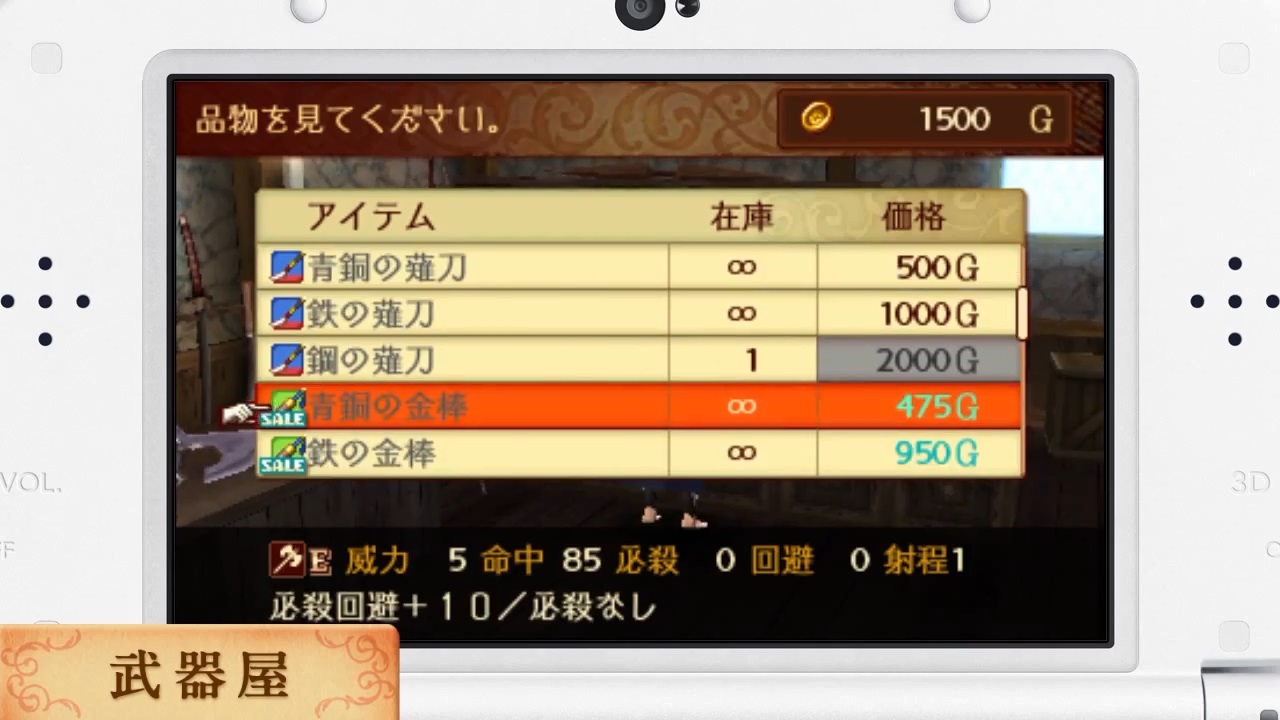
In any case, the weapons available at the start include Bronze, Iron, Steel and some ranged variants. Weapons are more costly than usual, likely as the result of weapon durability being gone.
For example, a Bronze Sword cost 350G in Awakening and a Bronze Katana costs 500G here. Which isn’t too bad until you reach the Iron and Steel Katanas, which now cost 1000G and 2000G versus Awakening’s 520G and 840G.
Additionally, some weapons (Steel and ranged) have limited stock (1 or 2), while some (basic Bronze and Iron) are unlimited.
To make matters easier, some weapons are occasionally on sale, perhaps depending on who’s in charge. Right now, Maces are on sale and Rinka is a Mace-wielder, so it’s not a massive stretch.
The building’s exterior gets upgraded too!
Next, you’ve probably noticed how buildings have Levels. Like constructing new buildings, Dragon Vein Points are again required to improve an existing building’s Level, eg. 1 point to elevate the Hoshidan Armoury to Level 2.
The Level 2 Hoshidan Armoury adds Silver weaponry, new ranged options and other special weaponry (like the Axeslayer Katana), while increasing the stock of limited stock weapons or making them unlimited.
Vendor

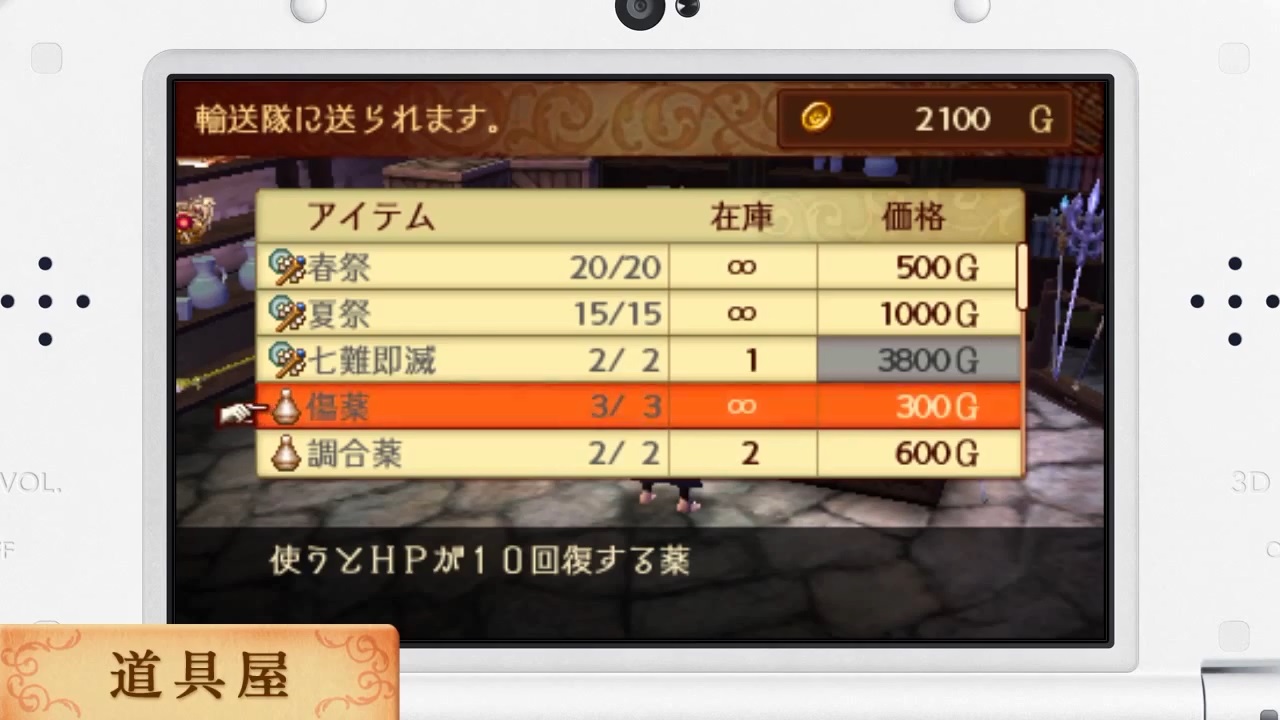
You can’t very well have Armouries without Vendors; in a similar manner, a Hoshidan Vendor costs 1 Dragon Vein Point to construct. As one would expect, they carry staves and healing items–the only items so far that still have durability.
As with weapons, the basic staves and healing items (eg. Spring Festival, Summer Festival, Vulneraries and temporary stat-boosters) have unlimited stock, while the better ones (eg. Shichinan Sokumetsu and Concoction) have limited stock.
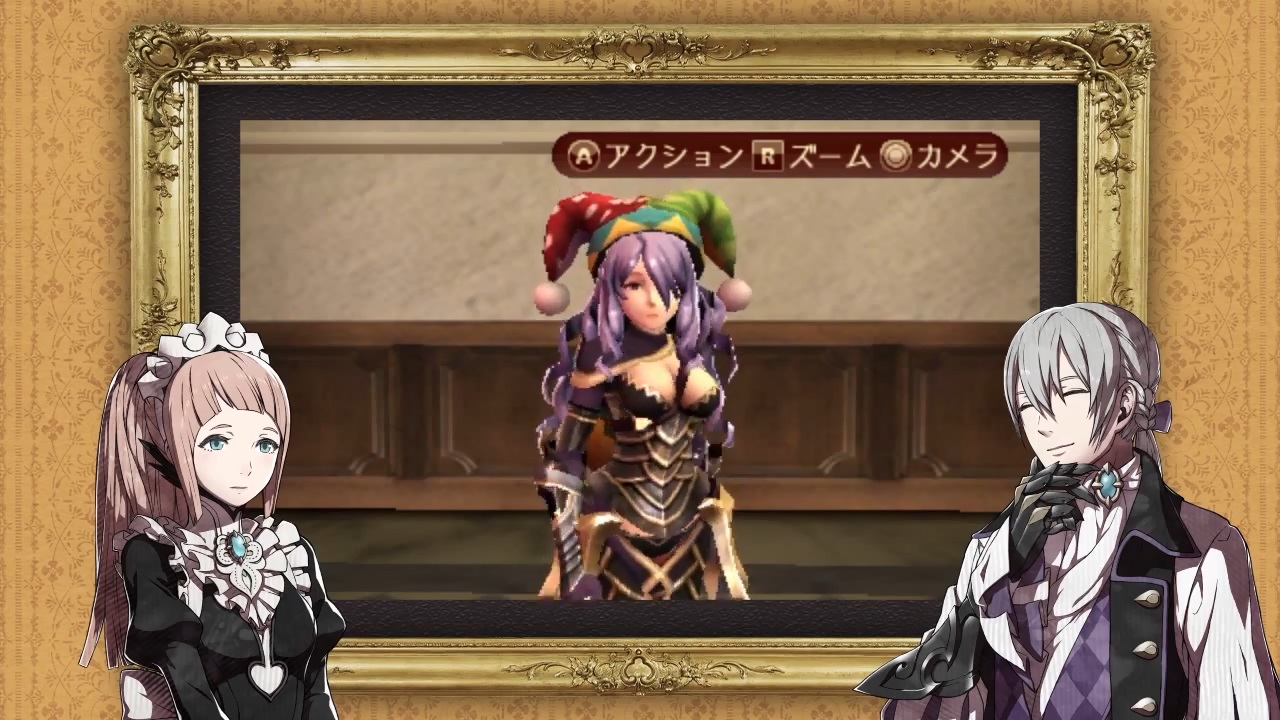
Accessory Shop

So far so normal, but now things start taking a bizarre turn, with the construction of the Accessory Shop. Here, players can outfit their characters with accessories bought using resources (such as Fish), which are (amusingly) reflected in the character’s battle model.
Accessories are divided into four categories: Hat, Face, Glove and Body(?). Hats appear to increase the damage dealt by 1 when battling an opponent at their My Castle, while face accessories reduce damage received by 1.
Below is a list of the known accessories.
Accessory (Hat)
| Name | Requires |
|---|---|
| Pink Hat | Green Vegetable x5 |
| Ascetic Headband | Fish x5 |
| Mage Crown | Topaz x10 |
| Princess Ribbon | Berry x5 |
| Headscarf | Coral x10 |
| Rustic Kerchief | Milk x5 |
| Flower Hairclip | Wheat x5 |
| Big Comb | Amber x10 |
Accessory (Face)
| Name | Requires |
|---|---|
| Ninja Mask | Amethyst x9 |
| Scarecrow Mask | Rice x4 |
| Round Glasses | ??? |
| Cross Eyepatch | ??? |
| Ogre Mask | Lapis Lazuli x9 |
Pressing “A” makes the character perform an action.
From the item descriptions, it’s likely that accessories only appear during optional My Castle battles, so fans concerned about accessories ruining the immersion of the story needn’t worry just yet (and you could always remove them anyway…).
While the example only shows the Avatar wearing a Scarecrow Mask, it appears possible to stack accessories of different types, as in a later scene, Camilla is simultaneously wearing a fox tail and jester mask.
Canteen

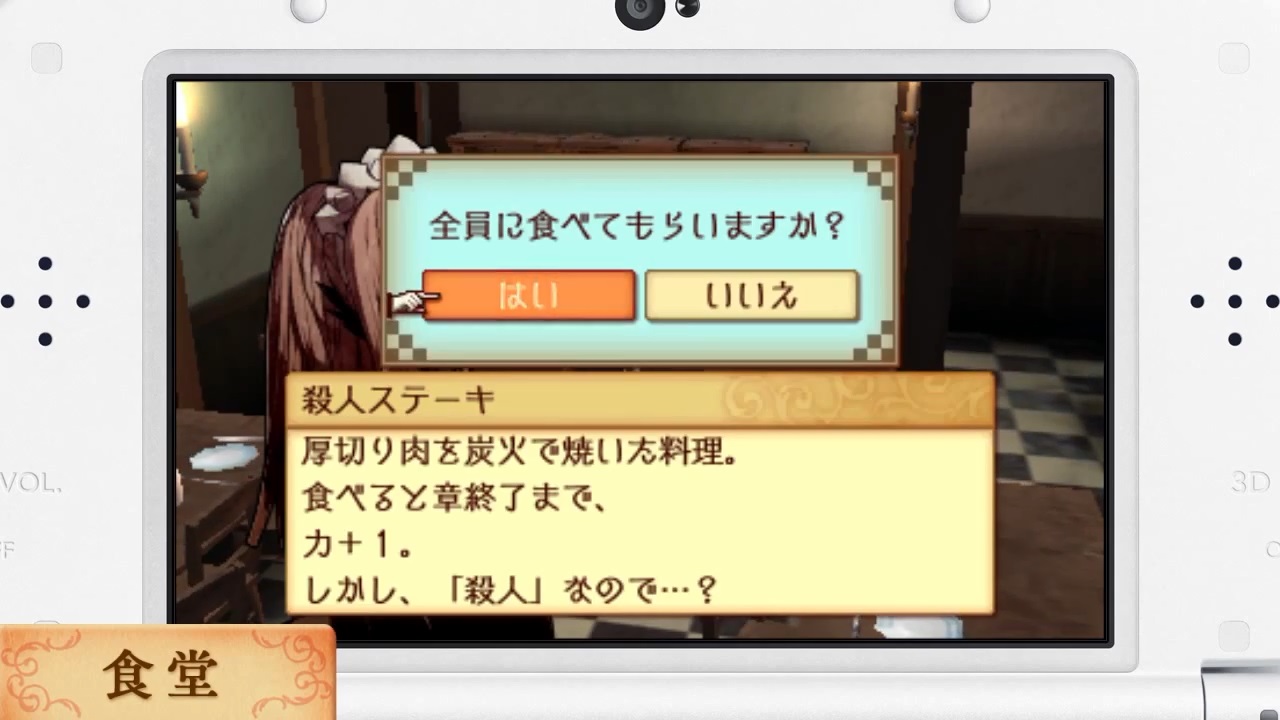
After you’ve recovered from the terrifying Scarecrow Mask, we move onto the slightly more sane Canteen, which currently happens to be run by the talented but extremely clumsy Felicia.
Players can fork over foodstuff (resources) to make food for their party members. Each type of foodstuff affects a particular stat; for example, Meat and Soybeans affect Strength, while Milk and Fish affect Speed.
In the example shown, Felicia uses the player’s Meat to create a “Killer Steak” that boosts the party’s Strength by 1 for one chapter. Whoa, food skills!
Sadly, the party members don’t seem impressed with the Killer Steak, but it seems to work as out of 14 characters, half of them receive the stat boost. However, the “Killer” property reduces all of the characters’ stats by 1, while increasing their Strength and Magic by 2.
Arena
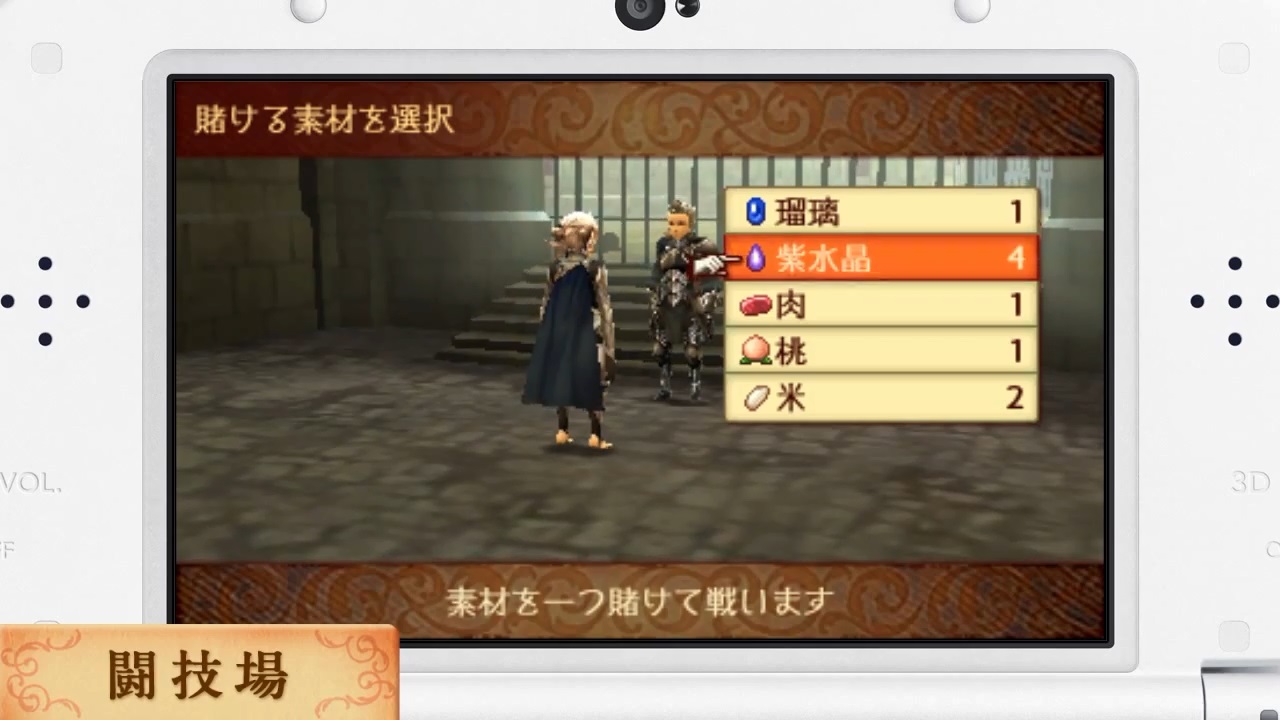

This facility was hinted by the developers in the Famitsu interview, but finally we learn what exactly the Arena does in this game. Before entering, players can select from a list of resources to gamble.
The example shown has a Samurai for the 1st round and if successful, the player will receive 1 extra Amethyst on top of the 1 Amethyst used to pay for the round.
So when the developers said the Arena doesn’t award experience or gold, this is probably what they meant. Resources earned can be used to create accessories or food or enhance weapons, so they’re sure to be useful.
Lottery Shop
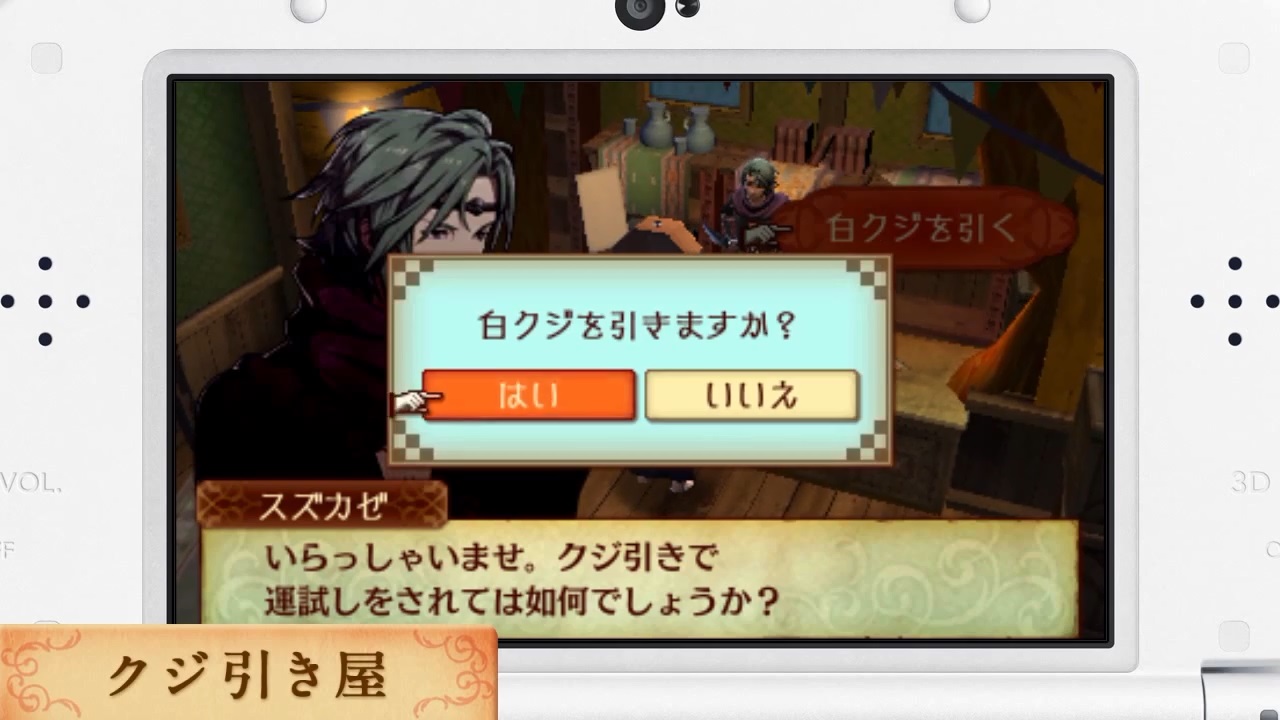
If you can’t get enough of gambling, there’s even a Lottery Shop. Here, you can try your luck to receive rare items, such as a Silver Naginata. At the moment, it’s unclear how you pay for the lottery, but gold or resources sounds logical.
Other Attractions
The following short sequence is a bit confusing, with Hinoka speaking with a generic Hoshidan Spellcaster and then turning away to leave–and the Spellcaster not even present in the scene. Your guess as to what’s happening is as good as mine.
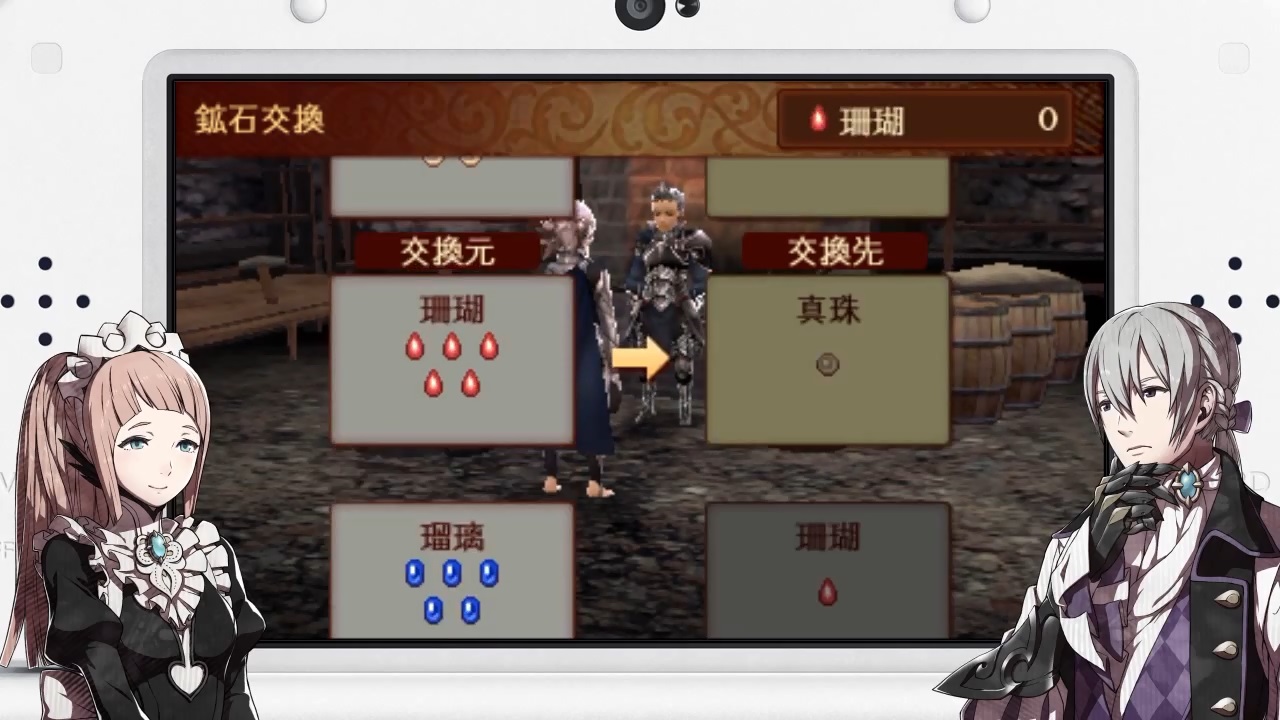
Slightly less confusing, the Avatar and Cyrus are engaging in an “Mineral Exchange” in the Forge, Here, they are trading minerals (resources) of different kinds, including Coral, Lapis Lazuli, Amethyst, Jade, Amber and Pearl.
On the left are the minerals being traded and on the right are the minerals being received. The exchange rate (5:1) seems relatively poor, but if you’re lacking a specific type of mineral, it may be worth using.
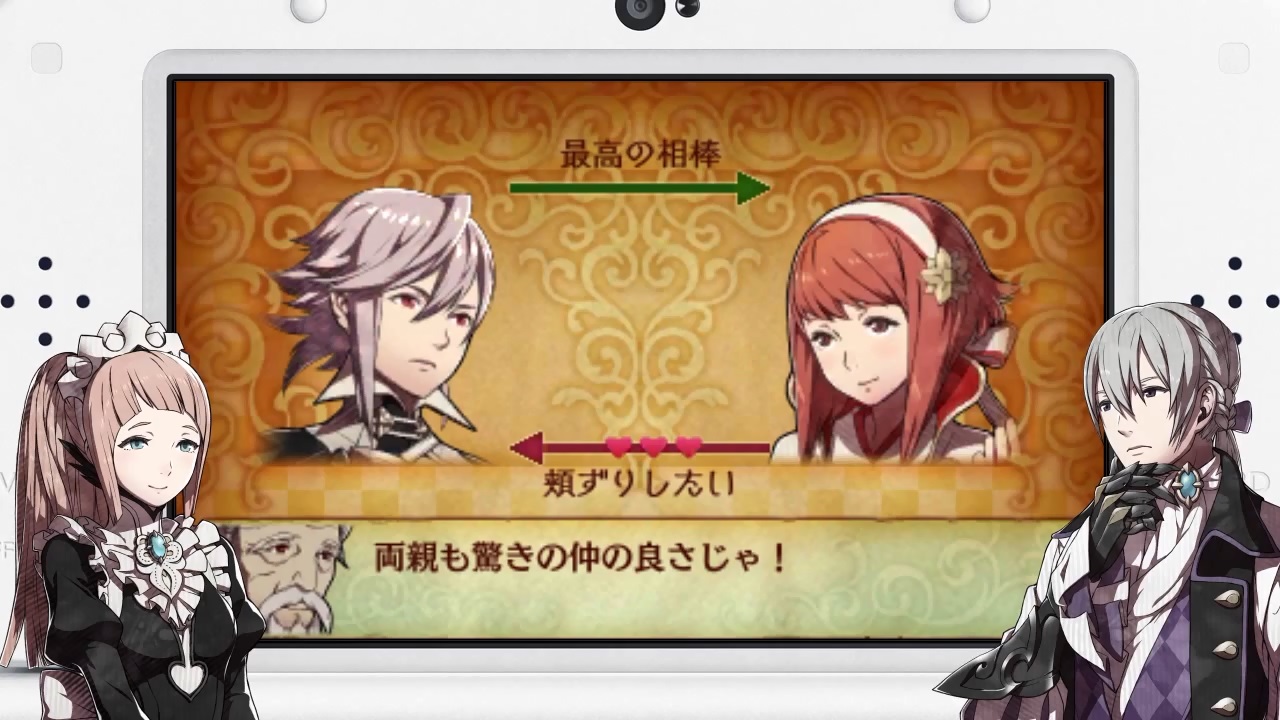
That’s a lot of new things so far, but we then have something familiar–the return of the Hubba Tester from Awakening, where you can test the “compatibility” of your characters. Like in Awakening, the results are probably completely unrelated to the game, but are fun to see.
Whew… that was a lot of things, but that’s just the first part. Please click here to continue to Part 2!